

How To Change Computer Display Settings
Z7_3054ICK0KGTE30AQO5O3KA30N0
hp-concentra-wrapper-portlet
![]() Actions
Actions
HP Products - Changing Display Settings, Background Image, Icons, and Screen Saver (Windows 8)
This document pertains to computers with Windows 8.
Learn how to change icon size, screen saver, desktop background, text size, and other desktop or display settings in Windows 8.
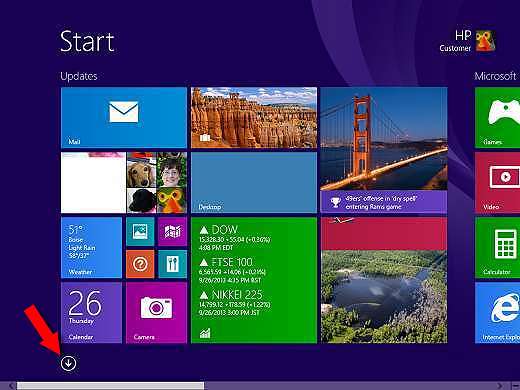
Figure : Windows 8 Start screen

note:If you are not using the latest version of Windows 8, some graphics and information in this document may vary. You can get the latest version from the Microsoft Store.
Changing the size of the display in Windows 8
Windows, by default, sets the display size to the native resolution (the true resolution of an LCD monitor screen). Use these steps to change the display resolution or to return it to the native (default) resolution. IOn an LCD or LED monitor, items in Windows may appear slightly out of focus when using a display resolution that does not match the native resolution of your monitor.
Changing the display resolution
Use the following steps to check the resolution for your monitor or display, or to change the resolution.
-
If you are using a CRT monitor, skip this step.
If you are using a flat panel display, find the native (maximum) resolution for the monitor. You can find the native resolution in the following places:
-
In the specifications on the box.
-
In the printed material that came with the monitor.
-
In the product specifications on the HP Web site.
-
-
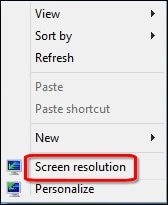
Right-click anywhere on the Windows desktop, and select Screen resolution.
Figure : Screen resolution option
-
Click Resolution and find the resolution listed with (Recommended).
This is the default resolution, and usually the highest supported resolution for your display. Lower resolutions are usually supported but the text and display quality might not be as good as the recommended setting, and the screen might not be centered, or might be stretched.
If you are using a CRT monitor, change the resolution to 1024 x 768.
Figure : Desktop Screen Resolution

-
Click OK.
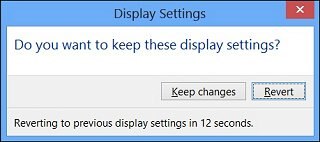
-
In the confirmation window, click Keep changes to save the settings, or click Revert to cancel the change.
Figure : Display Settings confirmation
Changing the size of text, icons and other Windows objects in Windows 8
Use these steps to customer your display objects without changing the display resolution.
-
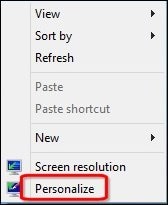
Right-click an empty area of the Desktop, and then click Personalize.
Figure : Personalize
-
Click Display to open the Display window.
Figure : Windows 8 Personalization options

-
To increase or decrease the size of the text and windows, use the mouse pointer to move the slider bar to the left or right, and then click Apply.
Figure : Windows 8 Display window

To complete the changes, select Sign out now.
-
To change the text size on specific desktop features, select an item in the drop-down list for Change only the text size and change the font size or bold the item.
Figure : Change the text size
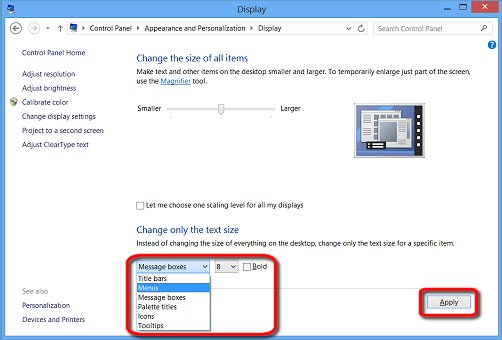
Click Apply to save the changes.
Customizing your Windows 8 Start Screen
Customize the Windows 8 Start screen to suit your own personal style and needs.
Rearranging the tiles on the Windows 8 Start Screen
The tiles on the Start Screen can be moved around or the size can be changed.
-
To open the Start screen, press the Windows key
 on the keyboard. You can do this from any screen at any time.
 -
Using the mouse, click and drag a tile to a new location on the Start screen.
-
To change the size of a tile, right-click the tile and select Resize.
-
Select the size you want form the list.
Figure : Change the tile size

Pinning apps and web pages to the Windows 8 Start Screen
Favorite or often used apps and web pages can be pinned to the Start screen:
-
Select an application or web location from Apps as follows:
-
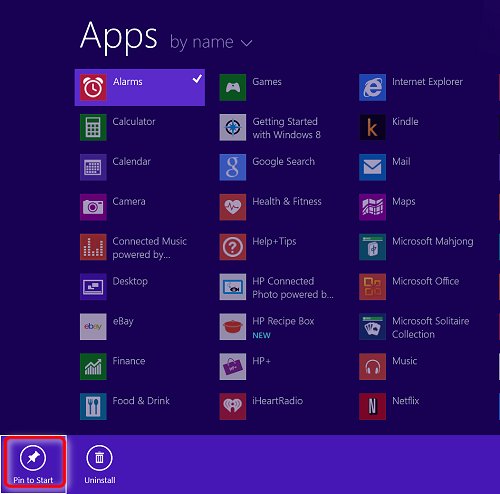
Click the All apps arrow in the lower-left corner of the Start screen.
Figure : The All apps arow
The Apps menu opens.
-
Right-click the application you would like to pin to the Start screen.
Figure : Example Apps menu
-
-
Select the Pin to Start icon from the options across the bottom.
note:
Windows Accessories and Windows System Apps have additional options, such as Run as administrator, Open file location, Open in new window, Pin to taskbar, and Find in Start.
Changing the Windows 8 Start Screen background
Use the following instructions to customize your Start screen background picture or color.
-
Press the Windows
+ I key. The Settings menu opens.
-
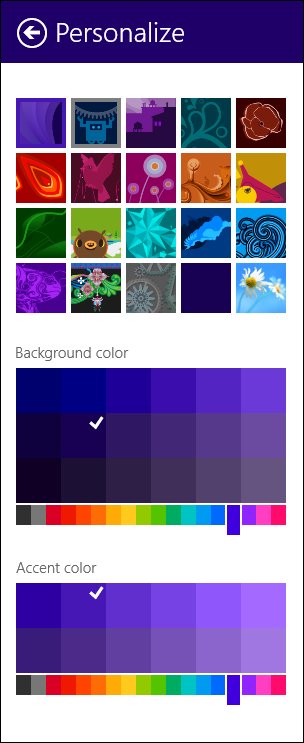
Click Personalize.
Figure : Personalize selection

-
Select one of the background choices or change the background or accent colors.
Figure : Personalizing the Start screen background and colors
Changing the Windows 8 Desktop
Use the following steps to personalize your Windows Desktop experience.
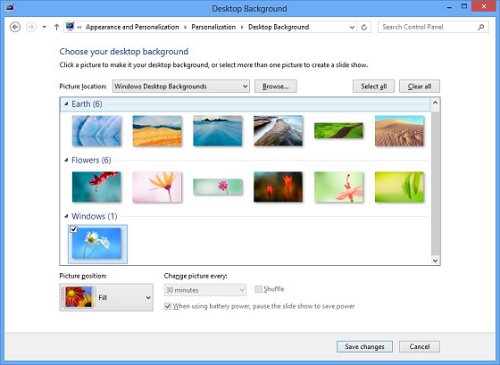
Changing the Windows 8 Desktop background
To change the pattern or wallpaper on the Windows Desktop, follow these steps:
-
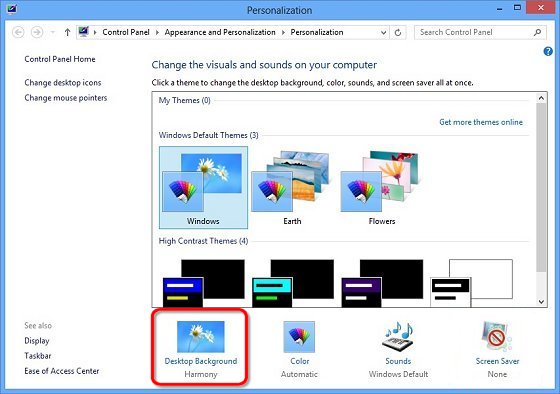
Right-click an empty area of the Desktop, and then click Personalize.
Figure : Personalize
-
Click Desktop Background to open the settings window.
Figure : Personalization window
-
To change the Desktop image, select one of the standard backgrounds, or click Browse and navigate to a picture stored on the computer. To use a personal picture as a background, save the picture in a file format with one of the following extensions: .bmp, .gif, .jpg, .DIB, .png.
Select more than one picture to create a Desktop background slide show.
Figure : Windows 8 background selections
-
Use the Picture position drop-down list to change the way the picture appears on the background.
If creating a slide show, choose how often the pictures change.
-
After making the adjustments, click OK to save the settings and close the Display Properties window.
Changing the Windows 8 Desktop icons
To adjust the size of the icons:
Right-click an open area of the Desktop and click View. Click Large icons, Medium icons, or Small icons.
Figure : Adjust icon size

note:You can quickly adjust the size of all icons by clicking the Desktop and pressing and holding the CTRL key and using the scroll wheel on the mouse.
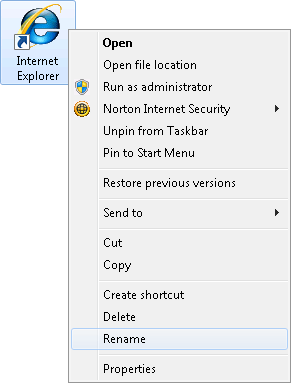
To change a folder name on the desktop:
Right-click the icon for the folder, and then click Rename. Type the new name and press Enter.
Figure : Rename
To create a new folder on the desktop:
Right-click an open area of the desktop, click New, and then click Folder.
Figure : New Folder

Pinning a folder or file to the Windows 8 Start Screen
Pin a folder or file to the Start screen as follows:
-
From Windows desktop view or from File Explorer, right-click the icon of the folder or file you want to pin to the Start menu.
-
Select Pin to Start
Figure : Pin new folder to the start screen

Changing the appearance of windows colors in Windows 8
You can use the Color and Appearance window to determine the colors that Windows uses for the default task bar, window border, and title bar color. To change the color, follow these steps:
-
Right-click the Desktop background, and click Personalize.
-
Click Color Automatic.
Figure : Windows 8 Color

-
Select a color from the color pallet, or click Show color mixer and create your own color.
Figure : Windows Color and Appearance

-
Click Save changes.
Adjusting the brightness of the screen in Windows 8
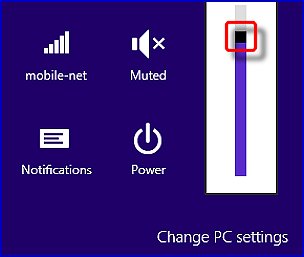
To adjust the screen brightness from the settings in the Charms menu, follow these instructions.
-
On the Start screen move the cursor to the upper right corner to open the Charms menu.
-
Click Settings.
Figure : Charms menu

-
Figure : Settings

-
Click the slider and drag it up or down to adjust the brightness of the screen.
Figure : Brightness control bar
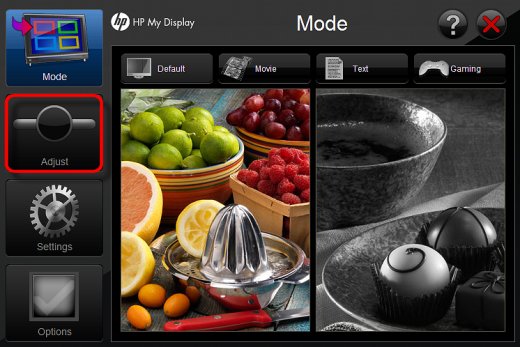
If the brightness feature is not available in Settings, use HP My Display to adjust the brightness.
After clicking Settings in the Charms menu, if it shows Brightness as Unavailable, continue with these instructions.
-
From the Start screen, type HP My Display
-
Click HP My Display.
Figure : HP My Display

-
Click Adjust.
Figure : HP My Display Mode screen
-
To adjust the brightness of the screen, click and drag the slider to the desired brightness.
Figure : Adjust screen

Advanced display settings in Windows 8
note:Your computer may have more tabs than those listed here. Many video card manufacturers provide settings designed for their video hardware. These extra settings vary by the type of video hardware used and are not discussed here.
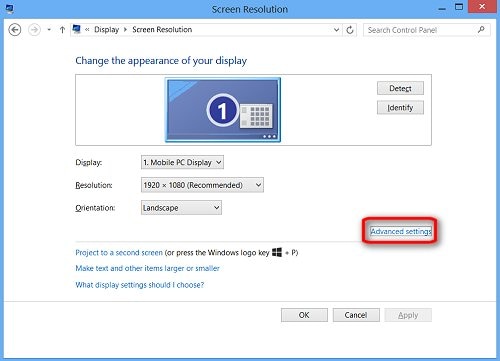
Follow these steps to open the advanced display settings.
-
Right-click an empty area of the Desktop, and then click Personalize.
-
Click Display to open the Display window.
-
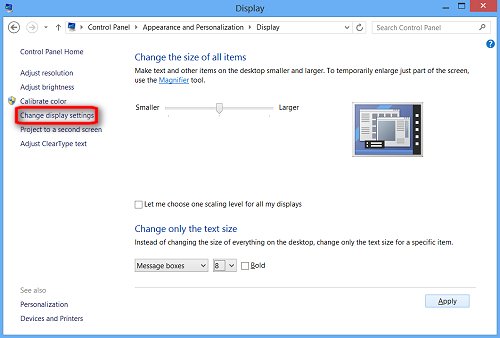
Click Change display settings to open the Display Settings window.
Figure : Change display settings
-
Click Advanced settings.
Figure : Display Settings
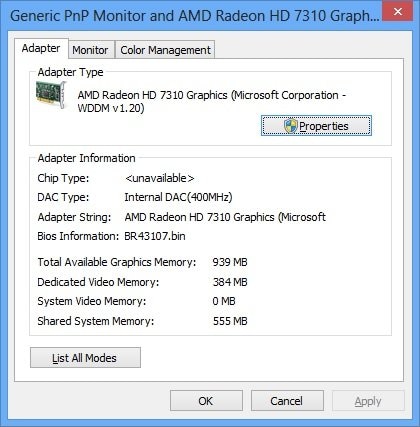
Adapter advanced display settings in Windows 8
Properties: Click the Properties button to access the hardware properties for your video card or on-board video hardware. This properties window can also be accessed through Device Manager.
List all Modes: Lists all the supported graphic resolutions and refresh rates that can be sent to the monitor by the video card or on-board video hardware. You can use the list of valid modes to find a mode that is compatible with the monitor you are using. After finding a compatible mode, you can change the refresh rate from the Monitor tab, and the display resolution from the Settings tab of the basic display properties window.
Figure : Adapter tab
Monitor advanced display settings in Windows 8
Properties: Click the Properties button to access the hardware properties for your monitor. This properties window can also be accessed through Device Manager.
Screen refresh rate: Determines how many times the monitor displays an entire screen in one second. Higher refresh rates may be more pleasing to the eye, but cause the video hardware to work harder and use more resources. Select a lower rate that is compatible with the adapter. If you can detect minute flickering or the change bothers your eyes, try adjusting the rate to the next available higher rate. Never exceed the rate available to the monitor.
caution:Do not remove the selection next to Hide modes that this monitor cannot display. Changing the refresh rate to a rate that the monitor cannot accept may permanently damage some monitors.
Colors: To change the number of colors, select a color setting from the Colors list. For the best compatibility, select True Color 32-bit if it is available. You can however select lower settings if colors are incorrect when using a particular software application.
Figure : Monitor tab

Using a screen saver in Windows 8
Windows is preloaded with a number of screen savers. Screen savers help prevent stationary images from burning a ghost image into the phosphors of CRT monitors. They are also used to show entertainment when the computer is not being used. To change the screen saver, follow these steps:
-
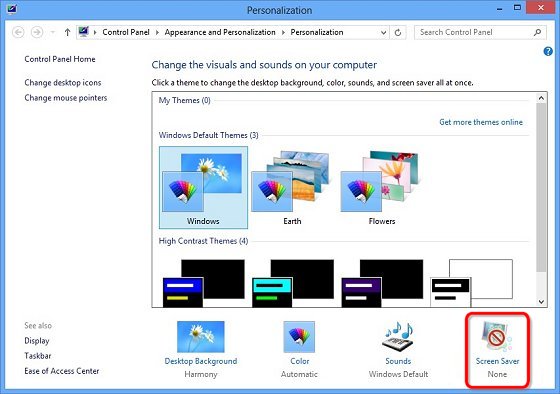
Right-click an empty area of the Desktop, and then click Personalize.
-
Click Screen Saver.
Figure : Personalization window
-
Select the screen saver to be used from the menu.
Figure : Screen Saver Settings

-
Click Settings to open a setting window for the selected screen saver (if settings are available).
-
Click Preview to see how the screen saver appears on the computer screen. Move the mouse to return to the Display Properties panel when finished previewing the screen saver.
-
Select the number of minutes in the Wait field. This is the number of minutes of inactivity that needs to pass before the screen saver opens.
note:
Make sure that the number of minutes for the screen saver is less than the number of minutes that it takes for the monitor to enter a sleep state.
-
Select On resume, display logon screen if you want the logon screen to open when anyone attempts to use the computer after the screen saver opens.
-
Click OK to save the settings and close the Display Properties window.
How To Change Computer Display Settings
Source: https://support.hp.com/us-en/document/c03366869
Posted by: storywiffaided1974.blogspot.com
0 Response to "How To Change Computer Display Settings"
Post a Comment